


Using Trekking poles as emergency splints?
In remote wilderness areas where professional medical help may be hours or even days away, the ability to improvise emergency care can be crucial. Among the most valuable skills for any outdoor enthusiast is knowing how to transform ordinary gear into life-saving equipment. Your trekking poles, typically used for stability and balance, can serve an entirely different purpose in emergency situations: as improvised splints for fractures and severe sprains.
Recommended trekking pole purchase link: https://s.click.aliexpress.com/e/_c4M7OWaN
When to Use a Pole Splint
Trekking pole splints are appropriate for stabilizing suspected fractures in arms or legs when:
- The injured person cannot move the limb without severe pain
- There's visible deformity or abnormal positioning
- You're more than an hour from professional medical help
- The person needs to be moved to safety
Important: Never attempt to realign bones or force a joint back into position. Splint the injury exactly as you find it.
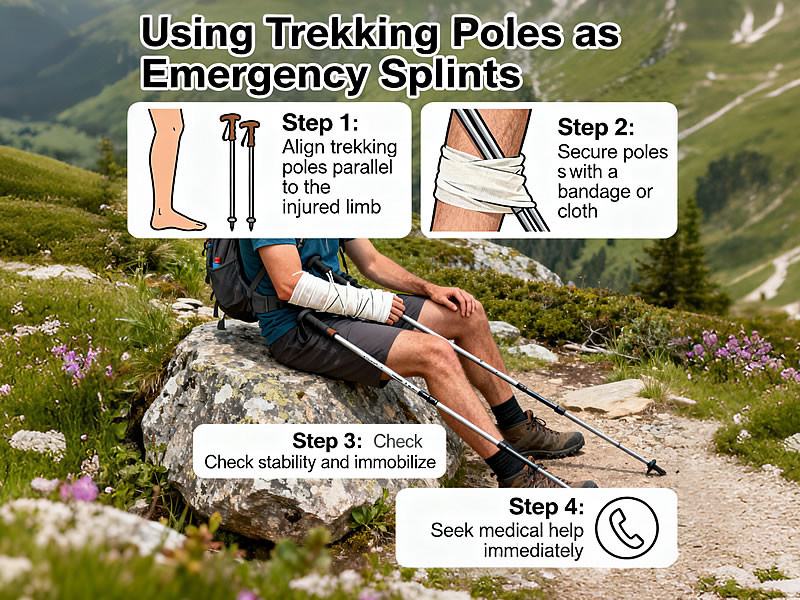
Creating an Effective Splint: Step-by-Step
1. Assess and Prepare
First, ensure the scene is safe. Carefully expose the injured area by cutting clothing away if necessary. Look for open wounds, bleeding, or obvious deformities. Keep the injured person calm and still.
2. Gather Materials
You'll need:
- Both trekking poles (collapsed to appropriate length)
- Padding material (clothing, fleece, foam sleeping pad)
- Fasteners (bandanas, paracord, zip-ties, or duct tape)
3. Pad the Injury
Wrap soft material around the injured limb, paying extra attention to bony areas. This provides comfort and helps stabilize the splint.
4. Position the Poles
For leg injuries: Place poles on either side of the leg, extending beyond the joints above and below the injury.
For arm injuries: One pole may suffice, placed along the underside of the arm.
5. Secure the Splint
Tie the poles firmly but not tightly at:
- Above the injury site
- Below the injury site
- Above the nearest joint above the injury
- Below the nearest joint below the injury
Never tie directly over the injury site. Check that you can slip two fingers under each tie.
6. Verify Circulation
After securing, check for pulse, capillary refill (press nail bed until white; should pink up within 2 seconds), and sensation beyond the injury. Recheck every 30 minutes.
Special Considerations for Different Injuries
Ankle/Foot Injuries: Create a stirrup splint by placing poles on either side of the ankle and securing them under the foot.
Knee Injuries: Immobilize the entire leg. Splint the knee in its found position without attempting to straighten it.
Forearm/Wrist Injuries: Include both the elbow and wrist in the splint. A rolled sleeping pad provides excellent additional padding.
Limitations and Important Precautions
- Trekking poles work best for straight bone fractures; they're less effective for joint injuries
- The metal tips can pose a puncture hazard - cover them with socks or cloth
- This is strictly a temporary measure for evacuation
- Never give food or water to someone with a serious injury who might need surgery
- Monitor constantly for signs of shock (pale skin, rapid pulse, confusion)
Practice and Preparation
Don't wait for an emergency to learn these skills. Practice splinting with a partner using harmless materials. Consider taking a wilderness first aid course for comprehensive training.
Conclusion
While we all hope never to face a serious injury in the backcountry, preparedness transforms fear into confidence. Your trekking poles represent more than just hiking aids—they're potential lifelines that can provide critical stabilization when help is far away. By understanding how to create an effective emergency splint, you add a crucial layer of safety to your outdoor adventures. Remember that improvisation is no substitute for professional care, but it can make the difference between a manageable evacuation and a catastrophic outcome. Equip yourself with knowledge, practice your skills, and hike with the confidence that comes from being prepared for whatever the trail may bring.


