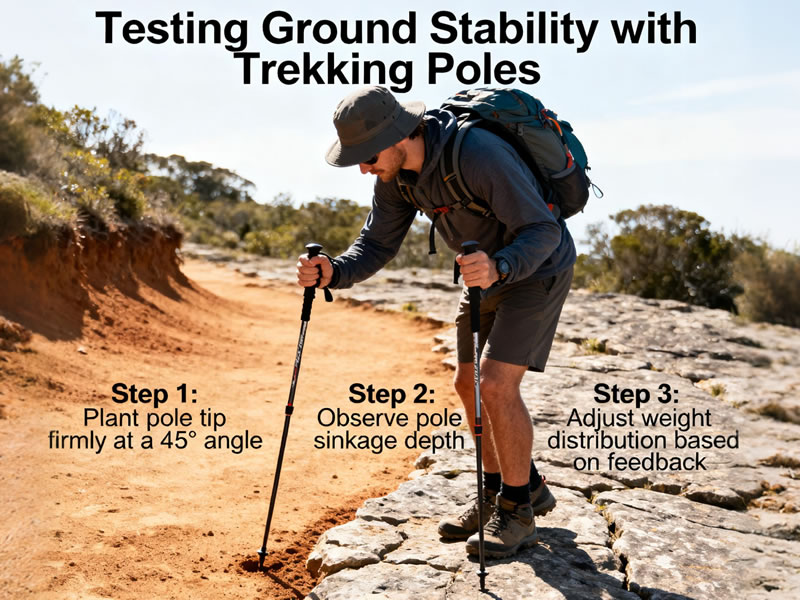
Using Trekking poles to test ground stability?
Trekking poles are far more than just walking aids—they're essential tools for assessing terrain safety in unpredictable environments. Whether you're navigating muddy trails, crossing snowfields, or traversing rocky slopes, the ability to test ground stability with your poles can prevent accidents and ensure a safer outdoor experience. This comprehensive guide explores professional techniques for using your poles as sophisticated probing instruments, helping you make informed decisions about where to place your feet in challenging conditions.

Why Pole Testing Matters
Unstable ground presents some of the most common—and potentially dangerous—hazards in the wilderness. From hidden voids under snow bridges to saturated mud that can swallow boots whole, unstable terrain requires careful assessment before committing your weight. Trekking poles serve as excellent preliminary testing tools because they:
- Provide reach to test areas beyond your natural stride
- Offer tactile feedback about subsurface conditions
- Allow testing without risking your balance or safety
- Can be used while maintaining a secure stance
Professional Probing Technique
Effective ground testing requires more than simply poking at the ground. Follow this systematic approach:
The Progressive Pressure Method
- Start with light pressure to assess surface firmness
- Gradually increase pressure to simulate footfall impact
- Note how the pole tip reacts: immediate sinking suggests instability
- Repeat tests at multiple angles to check for consistency
The Tap-Test for Rock Stability
When assessing loose rock or scree:
- Tap potential stepping stones with your pole tip
- Listen for hollow sounds that indicate unstable placement
- Watch for movement or shifting in the rock
- Note any reverberation through the pole that suggests poor contact
Snow and Soft Ground Assessment
For snow, mud, or sand:
- Insert the pole straight down at 90 degrees
- Note the depth of easy penetration
- Feel for changes in resistance that indicate different layers
- Measure sink depth relative to your pole's length markers
Terrain-Specific Applications
Wetlands and Bogs
- Test every step in potentially saturated areas
- Look for water seepage around the pole hole
- Note suction sounds when withdrawing the pole
- Avoid areas where the pole sinks beyond the basket
Snow Travel
- Probe extensively around potential snow bridges
- Check consistency across the entire suspected weak area
- Feel for air pockets or sudden changes in density
- Space probes no more than 20cm apart in critical areas
Rocky Terrain
- Test apparently stable rocks before weighting them
- Check for rocking or shifting motion
- Assess multiple contact points on larger rocks
- Listen for scraping sounds that indicate poor friction
Interpreting the Feedback
Learning to read your poles' feedback is crucial:
Positive Indicators (Generally Safe)
- Consistent resistance throughout the probe
- Firm stop with minimal penetration
- No water or mud seepage around the hole
- Solid "thud" sound rather than hollow echo
Warning Signs (Proceed with Caution)
- Sudden loss of resistance during probing
- Water immediately filling the probe hole
- Sinking beyond 1/3 of the pole length
- Inconsistent resistance across a small area
Danger Indicators (Avoid Area)
- Pole sinks to grip level with minimal pressure
- Complete lack of resistance (possible void)
- Multiple adjacent probes showing instability
- Visible water/mud surge around the pole
Safety Protocols
Always follow these safety guidelines when testing terrain:
- Maintain Secure PositioningKeep your weight on stable ground while probingTest from a balanced stance with knees slightly bentHave an escape route planned if the ground fails
- Use Proper EquipmentEnsure pole locks are secure before testingConsider reinforced poles for aggressive probingUse larger baskets in soft terrain to prevent sinking
- Group SafetyThe lead hiker should probe while others observeCommunicate findings clearly to the groupEstablish a turning-back point based on conditions
Advanced Techniques
The Grid Pattern
For particularly suspicious areas, use a systematic grid approach:
- Space probes 15-20cm apart in a pattern
- Mark safe points with natural materials
- Create a mental map of stable zones
The Weight Simulation Test
After initial probing, gradually transfer weight to the pole while maintaining balance on secure footing. This simulates actual footfall pressure more accurately.
The Shear Test
For slope stability assessment, apply lateral pressure to test for shear failure potential. This helps identify areas prone to sliding or collapse.
Limitations and Considerations
While extremely useful, pole testing has limitations:
- Cannot detect deep instability beyond pole length
- May give false confidence in certain conditions
- Should be supplemented with visual assessment
- Requires practice to interpret accurately
Always combine pole testing with:
- Visual inspection of the area
- Knowledge of local conditions and geology
- Weather and recent precipitation considerations
- Group consultation and experience sharing
Conclusion
Mastering ground stability testing with trekking poles transforms your relationship with challenging terrain. This skill turns your poles from simple walking aids into sophisticated assessment tools that can prevent accidents and improve route-finding decisions. Remember that no technique is foolproof—always err on the side of caution, and combine pole testing with other assessment methods. With practice, you'll develop an intuitive understanding of how to read the subtle feedback through your poles, making you a safer and more confident traveler in any environment. The ground might not always be willing to reveal its secrets, but with proper pole technique, you'll have a much better chance of listening to what it's trying to tell you.


