


Trekking Poles for Creating Emergency Shelters?
When unexpected weather changes or unforeseen circumstances leave you exposed in the wilderness, the ability to create emergency shelter can be life-saving. While dedicated shelter materials are ideal, your trekking poles—tools you likely already have with you—can serve as the fundamental framework for various emergency shelter designs. Understanding how to transform these versatile instruments into structural supports dramatically increases your safety margin in backcountry emergencies.
Recommended trekking pole purchase link: https://s.click.aliexpress.com/e/_c4M7OWaN
The Foundation: Why Poles Make Excellent Shelter Supports
Trekking poles possess inherent qualities that make them ideal for emergency shelter construction:
- Strength-to-weight ratio: Modern aluminum and carbon fiber poles offer surprising strength while remaining lightweight
- Adjustable length: Multiple sections allow for precise height adjustments to accommodate different shelter designs
- Natural rigidity: Their straight design provides reliable vertical support
- Portability: You're already carrying them, requiring no additional weight
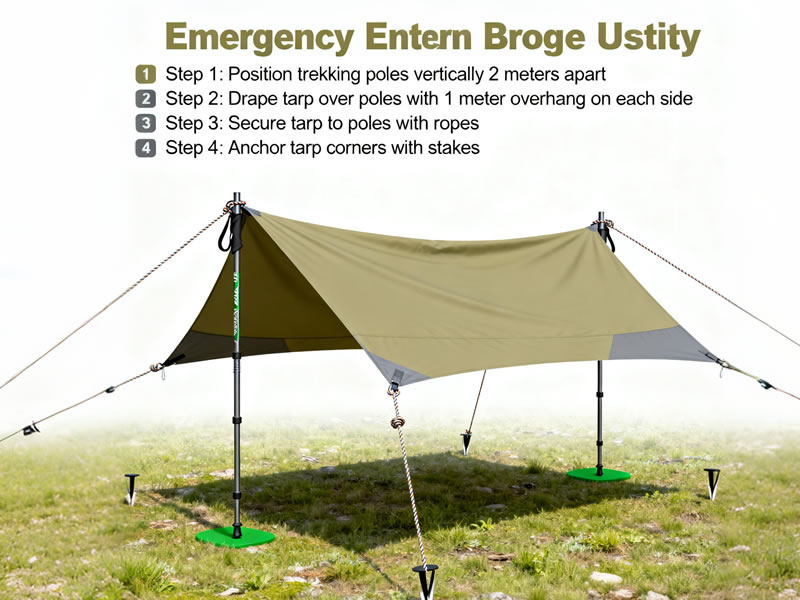
Shelter Design 1: The A-Frame Tarp Shelter
This classic design offers excellent weather protection and relatively simple construction:
Materials needed:
- Trekking poles (1-2)
- Tarp or emergency blanket (8x10' recommended)
- Cordage (25-50 feet)
- Ground stakes (optional but recommended)
Construction steps:
- Position your tarp on level ground with the long side parallel to wind direction
- Extend one pole to desired ridge height (3-4 feet is manageable)
- Place pole tip through tarp's center grommet or create a peak by wrapping material around tip
- Secure pole upright using guylines from the top to anchor points
- Stake out corners, creating 45-degree angles at the edges
- Adjust tension until the shelter is taut and weather-resistant
Pro tip: Use your second pole to create a more stable A-frame by crossing poles at the peak or using it as a horizontal support beam.
Shelter Design 2: The Lean-To Configuration
Ideal for quick setup and maximum visibility:
Construction steps:
- Find two trees approximately 7-8 feet apart
- Extend one pole horizontally between trees at chest height, securing with cordage
- Drape tarp over the horizontal pole
- Angle the sides down and secure to ground with stakes or heavy rocks
- Use your second pole to create additional support in the center if needed
Shelter Design 3: The Emergency Bivy
For minimal protection when materials are limited:
Construction steps:
- Extend one pole to full length and plant firmly in ground
- Drape emergency blanket or rainfly over the pole
- Secure edges with rocks, logs, or stakes
- Crawl underneath, using the pole as your headboard
Advanced Techniques and Considerations
Snow Shelter Support:
In winter conditions, poles can reinforce snow cave roofs or provide framework for quinzees. Place them horizontally across the ceiling to prevent collapse.
Multi-Person Shelters:
Combine multiple hiking parties' poles to create larger structures. Four poles can support a substantial group shelter using a pyramid configuration.
Improvised Joints:
Create stronger connections by:
- Using the basket as a stopping point for lashings
- Interlocking poles with each other's lever locks
- Creating notches in wooden poles with your knife
Essential Skills for Shelter Building
Knot Proficiency:
Master these essential knots:
- Taut-line hitch: For adjustable guylines
- Clove hitch: For securing poles to trees
- Square lashing: For joining poles together
Site Selection:
Always consider:
- Wind direction (shelter opening should be leeward)
- Water drainage (avoid low spots and drainage paths)
- Overhead hazards (dead branches, rockfall areas)
- Resource availability (stakes, anchoring points)
Limitations and Safety Considerations
While extremely useful, pole shelters have limitations:
- Height restrictions: Most poles max out around 55 inches, limiting standing room
- Weight capacity: Don't hang heavy items from pole shelters
- Durability: Continuous pressure on locking mechanisms can cause failure
- Weather limitations: High winds may require additional reinforcement
Always test your shelter system:
- Apply gradual pressure to test stability
- Check all connections before relying on the shelter
- Have a backup plan if conditions deteriorate
What to Carry in Your Pack
Enhance your pole's shelter potential by carrying:
- Lightweight tarp: Silnylon or silpoly materials pack small and weigh little
- 50 feet of paracord: Essential for rigging and securing
- Emergency blanket: Provides both shelter and warmth retention
- Extra tent stakes: Or know how to fashion wooden ones
Practice Makes Prepared
Don't wait for an emergency to test these skills:
- Practice in your backyard or local park
- Time yourself setting up different configurations
- Experiment with unusual anchoring situations
- Test shelters in various weather conditions
Conclusion
Trekking poles represent far more than walking aids—they're potential lifesavers that can provide critical protection when circumstances turn against you. By mastering a few simple shelter techniques and carrying minimal supplemental materials, you transform your poles into the foundation of emergency protection. Remember that the best shelter is one that gets built before the storm hits, so practice regularly and make shelter-building part of your outdoor skill set. Your poles have already helped you journey into the wilderness; with the right knowledge, they can also help ensure you return safely from it.


