


DIY trekking pole repair hacks?
For hikers, backpackers, and trail enthusiasts, trekking poles are non-negotiable gear—they ease knee strain, boost balance on rocky terrain, and even double as tent poles in a pinch. But there’s nothing more frustrating than a broken pole mid-adventure: a loose lock that won’t stay tight, a cracked grip that slips in your hand, or a shattered tip that skids on wet rock. When you’re miles from the nearest gear shop, pricey replacements aren’t an option. That’s where DIY trekking pole repair hacks come in—simple, effective fixes that use tools you already carry, turning a trail disaster into a minor detour. Below, we break down the most common trekking pole issues, step-by-step hacks to fix them, and pro tips to prevent future breakdowns.
Recommended trekking pole purchase link: https://s.click.aliexpress.com/e/_c4M7OWaN
Why DIY Trekking Pole Repairs Matter
Before diving into the hacks, let’s talk about why mastering these fixes is a hiker’s superpower. First, cost savings: A single trekking pole can cost 50–200, and replacing a pair mid-trip (if you can even find a shop) is a budget killer. DIY fixes let you extend your poles’ life for pennies. Second, trail independence: Imagine being 10 miles into a backcountry hike when your pole’s lock fails—without a fix, you’re stuck hobbling on uneven ground, risking injury. These hacks let you take control and finish your adventure safely. Third, sustainability: Throwing away a slightly broken pole adds to outdoor waste. Repairing instead of replacing reduces your environmental impact—a win for both you and the trails.
Common Trekking Pole Issues (and How to Fix Them)
Trekking poles break in predictable ways, usually from wear, impact, or improper use. Below are the most frequent problems, along with DIY hacks that work on the trail—no fancy tools required.
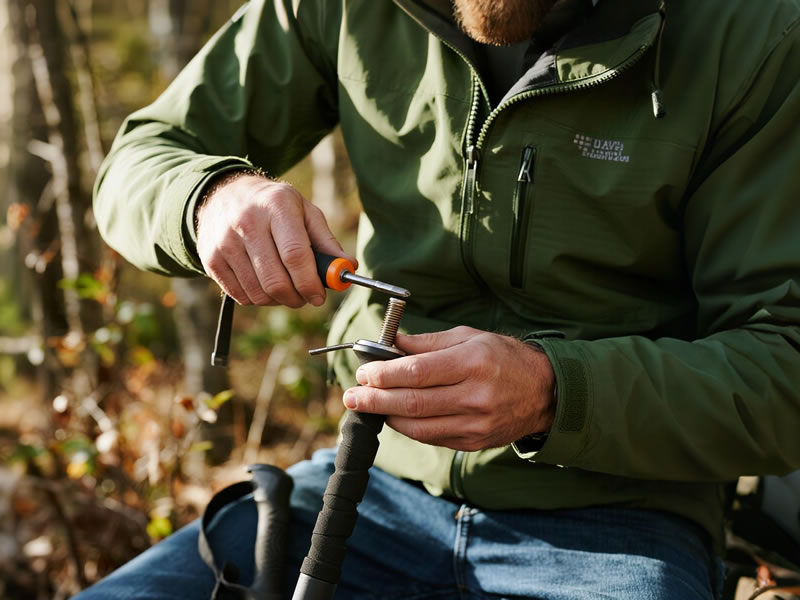
1. Loose or Slipping Lock Mechanisms
The #1 issue hikers face: telescoping poles that won’t stay extended, sliding down mid-step. This happens when the lock (usually a twist-lock or lever-lock) wears out, gets dirty, or loses tension.
- For Twist-Lock Poles: Start by cleaning the lock area—dirt and grit are often the culprit. Use a damp cloth (or wet wipe from your first-aid kit) to wipe the pole segments, then dry them with a towel. If it still slips, add friction with a rubber band: Wrap 1–2 rubber bands tightly around the lower segment (where it connects to the upper one), then twist the lock closed. The rubber adds grip, stopping the slip. For extra hold, rub a small amount of beeswax (carry a mini tin!) on the bands—beeswax is water-resistant and boosts friction without gumming up the pole.
- For Lever-Lock Poles: If the lever feels loose, check the small screw that holds the lever in place (most poles have this). Use a multi-tool (a must-have for hikers!) to tighten the screw—even a 1/4 turn can restore tension. If the lever is bent (from dropping the pole), gently straighten it with pliers (also in most multi-tools). If the lock still slips, wrap a thin layer of duct tape around the pole segment under the lever—this thickens the segment slightly, making the lock grip tighter.
- 2. Cracked or Peeling Grips
- Grips (usually foam or rubber) crack from sun exposure, sweat, or repeated use, leaving sharp edges that irritate your hands. A slipping grip also ruins your balance—dangerous on steep trails.
- Temporary Fix (On the Trail): Duct tape is your best friend here. Tear a strip of tape (2–3 inches long) and wrap it tightly around the cracked area, overlapping slightly to create a smooth, non-slip surface. For extra comfort, wrap the tape in the same direction your hand grips the pole (usually from bottom to top). If you have electrical tape (softer than duct tape), use that first— it’s gentler on your palms.
- Semi-Permanent Fix (Camp or Post-Trip): If you’re at camp, use super glue (carry a small tube of gel super glue—it’s less messy) to seal the crack. Apply a tiny amount to the crack, press it closed, and hold for 30 seconds. Then wrap with tape to keep it secure while it dries (10–15 minutes). For foam grips that are peeling, use a hot knife (from your camp kitchen) to trim the loose edges—be careful not to cut too deep!
- 3. Broken or Lost Tips
- The metal tip (usually tungsten carbide) at the bottom of the pole is designed to grip rock and dirt, but it can break off if you hit a hard surface (like a boulder) or get stuck in a root. A missing tip makes the pole skid on wet or smooth ground—huge safety risk.
- Trail Emergency Fix: Look for small, hard objects in your pack or on the trail: a metal washer (from your tent stakes), a small rock (smooth and round, about the size of a quarter), or even a bottle cap. Clean the end of the pole (wipe off dirt and debris), then use super glue to attach the object to the pole’s end. Hold it for 1–2 minutes to set, then wrap duct tape around the base to reinforce it. The washer/rock mimics the tip’s traction—perfect for getting you to camp.
- Post-Trip Upgrade: If you lose a tip, order replacement tips online (they cost 5–10 per pair) and install them at home. Most tips slide on and secure with a small set screw—use your multi-tool to tighten it. Pro tip: Carry 1–2 spare tips in your pack—they’re tiny and lightweight, so they won’t add bulk.
- 4. Wobbly or Bent Segments
- Poles can bend if you fall on them or use them to support too much weight (e.g., leaning on them while carrying a heavy pack). A wobbly segment ruins balance, and a bent segment can get stuck (making the pole impossible to collapse).
- For Wobbly Segments: Wobble usually happens when the segment’s connection is loose. First, clean the connection area (dirt can make wobble worse). Then, rub a bar of soap (or beeswax) on the male end of the segment (the part that slides into the upper segment). Soap acts as a mild lubricant, helping the segments fit together more tightly without slipping. If that doesn’t work, wrap a thin layer of duct tape around the male end—this reduces play in the connection.
- For Bent Segments: If the segment is slightly bent (not kinked), use pliers from your multi-tool to gently straighten it. Hold the pole steady against a tree (or a rock) and apply slow, even pressure—don’t force it, as this can crack the pole. If the segment is kinked (a sharp bend), it’s safer to stop using that segment—collapse the pole to the shortest length (using the other segments for support) and finish your hike. Kinked segments are prone to breaking completely, so replace them post-trip.
- Pro Tips to Prevent Trekking Pole Breakdowns
- The best DIY repair is the one you don’t need to do. Follow these tips to keep your poles in top shape:
- Clean Them Regularly: After every hike, wipe down the segments, locks, and grips with a damp cloth. Dirt and grit are the #1 cause of wear—removing them extends your pole’s life.
- Store Them Properly: Don’t leave poles in your car (extreme heat/cold damages locks and grips). Instead, store them in a cool, dry place—collapse them fully to reduce stress on the segments.
- Use Them Correctly: Trekking poles are for balance, not weight-bearing. Don’t use them to pull yourself up steep cliffs (use your hands or a rope instead) or to hit rocks (this breaks tips).
- Carry a Repair Kit: Pack a “pole repair mini-kit” in your backpack: 1 roll of duct tape, 2–3 rubber bands, a mini tin of beeswax, a small tube of super glue, and a multi-tool. It weighs less than 4 ounces but can save your hike.
- Final Thoughts
- Trekking pole breakdowns don’t have to ruin your adventure—with these DIY trekking pole repair hacks, you can fix most issues in 5 minutes or less, using gear you already carry. Whether you’re dealing with a loose lock, a cracked grip, or a missing tip, these fixes are practical, affordable, and trail-tested. By mastering these hacks (and following prevention tips), you’ll turn your poles into reliable companions that last for years—no expensive replacements required. So next time your pole acts up on the trail, don’t panic—grab your multi-tool and get to work. Your knees (and your budget) will thank you.


