


How to Use Trekking Poles for Downhill Hiking: Mastering Descents for Safety and Joint Preservation
Downhill hiking presents the greatest biomechanical challenge on the trail: controlling momentum while absorbing repeated, jarring impacts. When used correctly, trekking poles transform this punishing activity into a controlled, stable, and far safer descent. They are not just for balance; they become an integrated braking and shock-absorption system that protects your knees, conserves muscle energy, and prevents falls. Here’s how to master the technique.
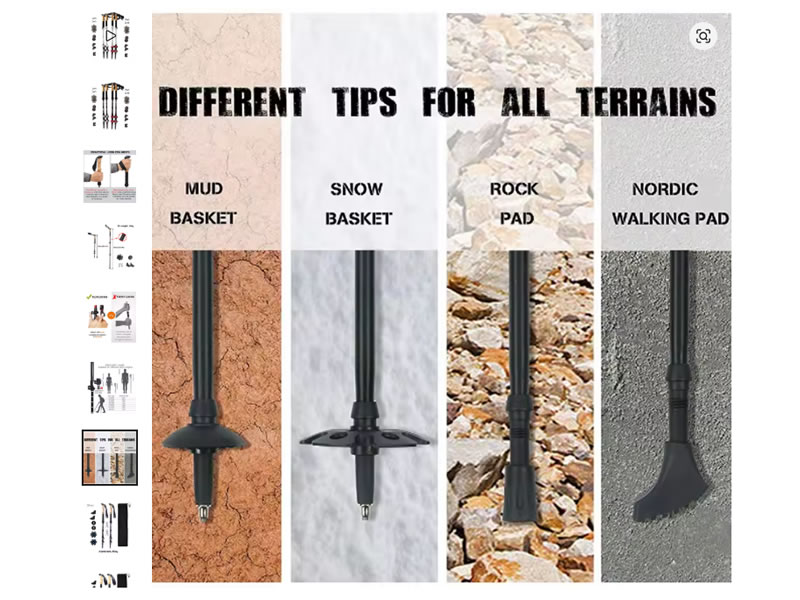
Recommended trekking pole purchase link: https://s.click.aliexpress.com/e/_c4M7OWaN
Step 1: The Critical Pre-Descent Adjustment
Before you begin your descent, lengthen each trekking pole by 5-10 cm (2-4 inches) from your flat-ground or uphill length. This is non-negotiable. On a slope, the ground falls away from you. A longer pole allows you to plant it securely ahead of your body without being forced into an awkward, hunched-over posture. Your goal is to maintain a relatively upright torso with a relaxed arm reach.
Step 2: The Core Technique – The Controlled Plant, Step, and Lean
The downhill rhythm is a deliberate, three-part cycle:
- Plant Ahead for a Stable Anchor: As you prepare to take a step, plant both pole tips securely on the ground ahead of you and slightly to the sides. They should be positioned where your next footfall will land or just beyond it. This creates a stable "anchor" or "handhold" in front of you. Ensure the carbide tips bite into the terrain—don’t just tap the surface.
- Step Forward with Confidence: With your poles firmly anchored, step forward between them. Your forward momentum is now partially checked by the poles. As your foot lands, keep your knee slightly bent to act as a natural shock absorber.
- Transfer Weight and Control the Descent: This is the key action. As your body weight moves over your forward foot, actively push down and back through the poles via your palms and wrist straps. Imagine you are using the poles to gently lower your body down the trail, like using a banister. This transfers a significant portion of the impact and braking force from your knees and quadriceps to your arms, shoulders, and back.
- Repeat with Rhythm: As your body passes the planted poles, lift and re-plant them ahead for the next step. Establish a steady, controlled rhythm: plant-step-transfer, plant-step-transfer.
Step 3: Advanced Techniques for Steep or Technical Terrain
- The "Double Plant" for Steep Drops: On very steep steps or loose sections, plant both poles together for maximum stability, then lower yourself down using your arm strength as the primary support before moving your feet.
- Side-hilling/Traversing: When crossing a slope, adjust pole lengths unevenly. The uphill pole should be shorter and the downhill pole longer to maintain a level grip and better balance.
- Loose Rock (Scree) and Gravel: Plant your poles firmly behind you in the stable ground you’ve already crossed, using them to slow your slide and steer, rather than trying to find purchase in the moving surface ahead.
Common Mistakes to Avoid
- Poles Too Short: This causes a hunched posture, eliminates useful reach, and renders the poles ineffective for shock absorption.
- Dragging or Tapping Poles: Each plant must be intentional and load-bearing. A dragging pole provides no stability.
- Planting Too Close to Feet: This offers no forward stability or braking leverage. Poles must be ahead of your center of gravity to be effective.
- Locking Your Elbows or Knees: Keep joints slightly bent and relaxed to absorb shock naturally.
- Leaning Back: Resist the instinct to lean away from the slope. A slight forward lean, supported by your poles, keeps your center of gravity over your feet for better traction and control.
The Science of Protection: Why It Works
Downhill hiking eccentrically loads your quadriceps (the muscle-lengthening under tension that causes soreness) and places compressive forces of 3-5 times your body weight on knee joints with each step. Trekking poles mitigate this by:
- Reducing Knee Load: Studies show they can reduce compressive force on the knees by up to 25-30%.
- Distributing Effort: They engage the latissimus dorsi, triceps, deltoids, and core muscles, sharing the braking work.
- Improving Traction: The forward points of contact increase the downward force on your feet, improving grip on slippery surfaces.
- Preventing Falls: The forward anchor points provide immediate correction for slips or trips, preventing catastrophic falls.
Conclusion: Descend with Intelligence, Not Just Brakes
Using trekking poles correctly for downhill hiking is about proactive control, not just reaction. By lengthening your poles, planting them decisively ahead, and using your upper body to lower your mass, you turn a grueling, joint-pounding ordeal into a rhythmic, stable, and sustainable part of your hike. This technique is the single most effective way to preserve your knees, reduce full-body fatigue, and safely enjoy mountainous terrain for years to come. Remember: Longer poles, plant ahead, push to lower. Your joints will thank you for miles.


