


How to Attach a GoPro or Action Camera to a Hiking Pole?
Attaching an action camera to your trekking pole unlocks unique perspectives, turning a simple hike into a dynamic filming opportunity. It allows for stable, low-angle shots, immersive POV footage, and hands-free operation. The process is straightforward with the right accessories, but requires attention to security and vibration management to protect your gear. This guide covers the best methods, essential hardware, and pro tips for getting great footage.
Recommended trekking pole purchase link: https://s.click.aliexpress.com/e/_c4M7OWaN
Core Method: The Universal Pole Mount
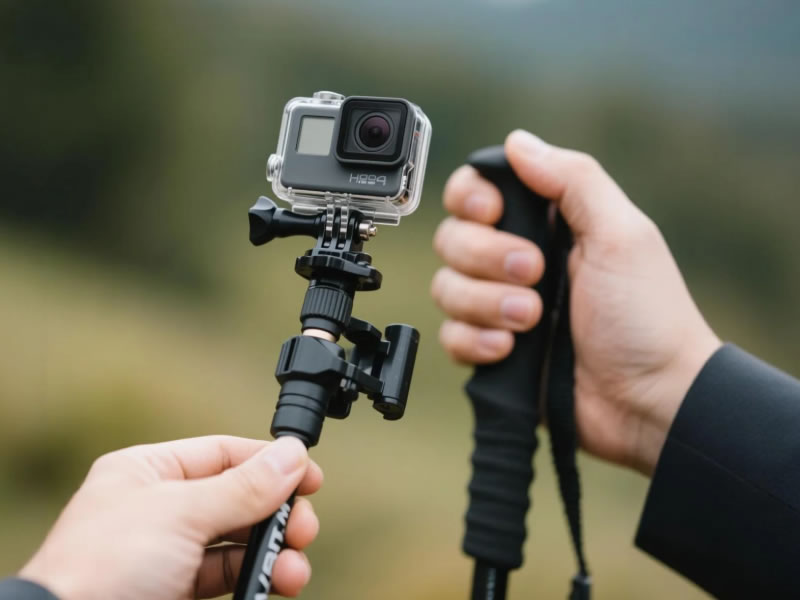
The most reliable and versatile solution is a universal pole mount adapter. This is a two-part system:
- The Mount: A clamp or adhesive base that attaches permanently or semi-permanently to your pole's shaft.
- The Camera Interface: The standard 1/4"-20 tripod screw (used by GoPro via its standard thumbscrew mount) or the GoPro "fingers" mounting system.
Step-by-Step Process:
- Choose the Mount: Select a sturdy, aluminum clamp mount (often sold as "trekking pole camera mounts"). Avoid flimsy plastic clamps. For a permanent solution, a flat adhesive mount can be stuck to the shaft, but this is less versatile.
- Attach to Pole: Secure the mount to your pole's shaft, ideally just below the grip for better balance. Position it so the camera's lens will clear the pole when attached. Tighten all screws firmly.
- Attach the Camera: If using a GoPro, the simplest path is to use the official "Shorty" mini tripod/telescoping pole or a GoPro "Handlebar/Seatpost/Pole" mount which clamps directly to the shaft. For other cameras or a more robust setup, screw a small ball head or a GoPro tripod mount adapter onto the clamp's 1/4"-20 thread, then attach your camera.
- Secure with a Tether: This is non-negotiable. Always use a wrist lanyard or safety tether connecting your camera directly to your pole's strap or your wrist. If the mount fails, this prevents a catastrophic loss.
Alternative & DIY Methods
- GoPro Handlebar/Seatpost Mount: This is a purpose-built rubberized clamp for cylindrical objects. It works perfectly on most trekking pole shafts and is a dedicated, secure GoPro solution.
- Grip-Top Mount (For Specific Poles): Some LEKI poles have a built-in 1/4"-20 thread under the grip cap. This positions the camera very high, which can feel unbalanced but is convenient.
- DIY with Zip Ties & a Flat Mount: In a pinch, you can secure a GoPro flat adhesive mount to the shaft using robust zip ties or Gaffer's tape (not duct tape, which leaves residue). This is a temporary field fix, not a long-term solution.
Pro Tips for Optimal Footage and Safety
- Combat Vibration: Pole plants transmit shock directly to the camera, causing shaky footage.**Use a Flexible Mount: A GoPro "Jaws: Flex Clamp" or a short extension arm with a joint can act as a mini shock absorber.Adjust Your Grip: Hold the pole lightly below the camera mount to dampen vibrations from your hand.Post-Processing: Use video editing software with good stabilization features (like GoPro's Hypersmooth or editing software stabilization).
- Frame Your Shot:Angle is Everything: Mount the camera facing forward, backward (for follow shots), or even sideways for a unique perspective. A ball head is invaluable for fine-tuning the angle without adjusting the entire pole.Mind the Pole: Ensure the pole itself isn't dominating the frame. You typically want it at the bottom edge.
- Power & Storage Management:Filming in high resolution drains batteries and fills memory cards quickly. Carry spare batteries and a high-capacity SD card.Consider using a media mod or external microphone if capturing audio is important, as wind noise on the pole can be significant.
- Hiking Workflow:Start/Stop with Voice Control: Use your camera's voice commands to start/stop recording without touching it.Check Connections Frequently: Trail vibration can loosen mounts. Periodically give everything a firm twist to ensure it's tight.
What NOT to Do
- Do Not use a weak, plastic phone holder clamp. They are not designed for trail impacts.
- Do Not mount the camera in a way that interferes with your pole's locking mechanism or strap.
- Do Not assume the mount is infallible. The safety tether is mandatory.
Recommended Gear List
- Camera: GoPro HERO series, Insta360 (with a pole mount adapter), DJI Osmo Action.
- Mount: GoPro Handlebar/Seatpost Mount, Ulanzi or SmallRig metal pole clamp, GoPro Shorty.
- Accessories: Small ball head (e.g., Manfrotto PIXI style), safety wrist lanyard, spare batteries.
Final Verdict: A Stable Platform for Adventure
Attaching an action camera to your hiking pole is a simple and highly effective way to capture immersive trail footage. By investing in a solid metal clamp mount, always employing a safety tether, and using a flex joint or ball head to manage vibration, you create a reliable filmmaking tool.
Whether you're documenting a summit push, capturing wildlife, or simply sharing your journey, your trekking pole transforms from a stability aid into a versatile camera rig, letting you tell the story of your hike from a compelling, first-person perspective.


