


How to fully disassemble and deep‑clean trekking poles after muddy treks?
After a muddy trek in Brazil’s Atlantic Forest, the Pantanal, or any wet, clay‑rich environment, your trekking poles can become caked with abrasive mud, sand, and organic matter. A quick rinse is not enough. To keep your poles functioning smoothly and prevent corrosion, you need to fully disassemble and deep‑clean them periodically. This guide will walk you through the complete process, from disassembly to reassembly, ensuring your poles last for years.
Recommended trekking pole purchase link: https://lightenup.aliexpress.com/store/1101521655
When to deep‑clean vs. routine cleaning
- Routine cleaning (after every muddy hike): Rinse with water, scrub locks, dry extended. Takes 5 minutes.
- Deep‑clean (every 3‑6 months or after extremely muddy treks): Full disassembly, soaking of parts, thorough drying, and lubrication. Takes 30‑60 minutes.
Tools and materials you will need
- Warm water
- Mild dish soap
- Soft‑bristled brush (toothbrush, small scrub brush)
- Old cloth or paper towels
- Isopropyl alcohol (for cleaning metal parts)
- Silicone spray or light machine oil (for lubrication)
- Small flathead screwdriver (for removing pins if needed)
- Optional: rubber gloves, a bowl for soaking, compressed air canister
Step 1: Extend and inspect
Before disassembly, extend each pole to its full length. Note any damage: bent sections, cracked grips, or worn tips. This will help you decide if parts need replacement.
Step 2: Remove baskets and tips
- Unscrew or pull off baskets. If they are caked with mud, soak them separately.
- Remove carbide tips if they are replaceable (screw‑on or press‑fit). This allows you to clean the ferrule and the tip seat. If not replaceable, leave them in place.
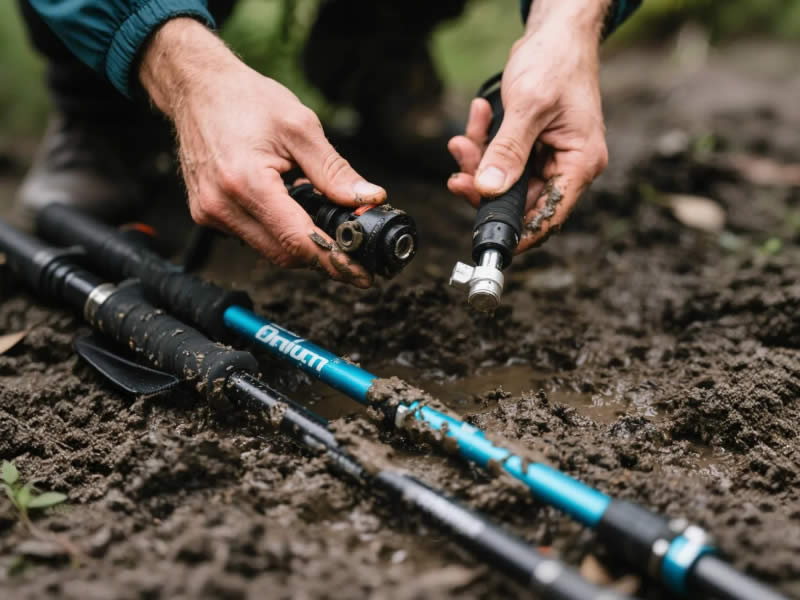
Step 3: Disassemble the poles into individual sections
For telescopic poles (3‑section):
- Unlock each section (open lever locks or loosen twist locks).
- Pull the sections apart completely. You will have three separate tubes: top (grip section), middle, and bottom (tip section).
- For lever locks, you may also be able to remove the lever assembly if it has a screw – but usually, leave it attached.
For foldable (Z‑poles):
- Fold the poles completely, then separate the sections by pulling the cord – but be careful not to lose the internal shock cord. Many Z‑poles are not designed for full disassembly; instead, extend them and clean each section externally. Consult your manufacturer’s instructions.
Step 4: Clean each section
- Soak the metal tubes in warm, soapy water for 10‑15 minutes to loosen dried mud.
- Scrub the inside of the outer tubes using a bottle brush or a cloth wrapped around a dowel. Pay attention to the area where the lock clamps – mud there will prevent secure locking.
- Scrub the inner shafts (the outside) with a soft brush, removing all visible mud.
- Clean the locking mechanisms:Lever locks: Open the lever fully. Use a toothbrush to scrub the cam, the pivot, and the inside of the clamp. Rinse with water.Twist locks: Unscrew the knob completely (if possible). Clean the plastic cam, the threads, and the inside of the outer tube. Be careful not to lose small parts.
- Wipe the grips with a damp cloth. If the grip is removable, slide it off and clean underneath (for foam/cork grips that are not glued).
Step 5: Rinse and dry thoroughly
- Rinse all parts with clean water to remove soap residue.
- Dry each piece with a cloth. Then let them air dry for at least 1‑2 hours in a well‑ventilated area. Use compressed air to blow moisture out of locks and small crevices.
- Do not reassemble damp – trapped moisture will cause corrosion and sticking.
Step 6: Lubricate and reassemble
- Apply a thin layer of dry lubricant (silicone spray) to the inner shafts. Wipe off excess. Do not lubricate the clamping surfaces.
- For lever locks: Put a single drop of light oil on the hinge pin.
- For twist locks: Apply silicone grease to the threads only.
- Reassemble by inserting the inner shafts into the outer tubes. For telescopic poles, slide the sections together in the correct order (tip section into middle, middle into top).
- Lock each section and test that the pole extends and collapses smoothly.
Step 7: Reattach baskets and tips
- Screw or press‑fit the baskets back onto the tip ferrules.
- If you removed carbide tips, clean the ferrule threads and screw in new or old tips (apply a tiny drop of threadlocker if needed).
Step 8: Final test and storage
- Extend the pole to your usual length and lock it. Apply body weight – the pole should not slip.
- Collapse and extend several times to ensure smooth operation.
- Store the poles extended in a dry place. Never store them collapsed and wet.
Deep‑cleaning frequency guide
| Use intensity | Deep‑clean frequency |
|---|---|
| Hiking every weekend in muddy conditions | Every 2‑3 months |
| Occasional muddy treks (few times per year) | After each major muddy trek |
| Only dry, dusty trails | Once a year |
Special considerations for Brazilian conditions
- Terra rossa (red clay) is acidic and can corrode aluminium if left on. Always deep‑clean after a trek in the Mantiqueira or Atlantic Forest.
- Sand from coastal trails (e.g., Ilha Grande) acts as abrasive. Rinse and scrub thoroughly.
- Humidity speeds up corrosion. After deep‑cleaning, store poles in an air‑conditioned room or with silica gel packs.
What to do if you find damaged parts during disassembly
- Worn carbide tips: Replace with new ones (Decathlon, Adventure Sport, Mercado Livre).
- Cracked foam grip: Replace (see our guide on replacing foam handles).
- Bent shaft: Straighten if mild (aluminium only) or replace section.
- Rust on steel components: Remove with vinegar and steel wool, then oil.
Conclusion
Fully disassembling and deep‑cleaning your trekking poles after muddy treks may seem tedious, but it is the best way to ensure long‑term reliability and safety. By separating each section, scrubbing away hidden mud, drying meticulously, and lubricating correctly, you prevent corrosion, lock slippage, and sticking. A little maintenance now saves you from buying new poles later. So next time you come home covered in Atlantic Forest clay, take an extra 30 minutes to give your poles the deep clean they deserve.


