


How to photograph Milky Way while camping?
Friday, June 20, 2025
Capturing the Milky Way requires equal parts artistry and astrophysics. With light pollution increasing 9.6% yearly (Science Advances), pristine dark skies near campsites are vanishing treasures. This step-by-step system guarantees galactic success—even with entry-level gear.
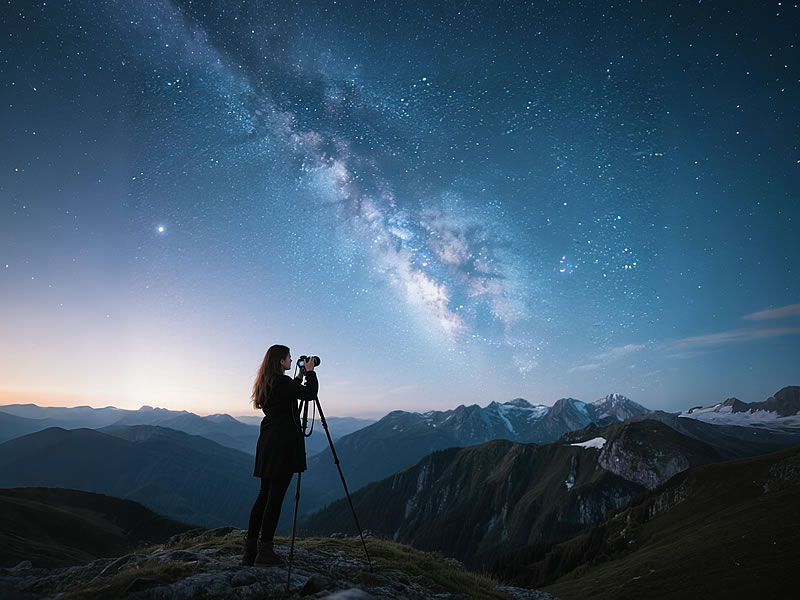
🌌 Essential Gear: Beyond the Camera
| Item | Specification | Purpose |
|---|---|---|
| Camera | APS-C/Full-frame + Manual Mode | Low-light sensitivity |
| Lens | f/2.8 or wider (14-24mm) | Maximize light intake |
| Tripod | Carbon fiber w/ hook | Zero vibration |
| Intervalometer | $20 wired remote | Prevent shake |
| Headlamp | Red light mode only | Preserve night vision |
*Pro Tip: Rent a Samyang/Rokinon 14mm f/2.8 – $30/week, outperforms $1K lenses.*
⚙️ Camera Settings: The Galactic Formula
- Aperture: Widest setting (f/1.4–f/2.8)
- Shutter Speed: Calculate via 500 Rule:500 ÷ Focal Length = Max Seconds*(e.g., 14mm: 500 ÷ 14 = 35 seconds)*
- ISO: 3200–6400 (Test for sensor noise)
- White Balance: 4000K (Cooler tones reduce airglow)
- File Format: RAW (10x more data than JPEG)
Critical Focus Technique:
- Turn off autofocus
- Locate bright star via Live View
- Magnify 10x → adjust focus ring until star is pinpoint sharp
📅 Planning: Timing is Everything
Astronomical Factors:
- New Moon Phase: >90% moon illumination ruins shots
- Milky Way Core Season:Northern Hemisphere: April–SeptemberPeak Visibility: 10 PM–2 AM in June
- Bortle Scale: Use ClearDarkSky.com – target Class 1–3 zones
Environmental Prep:
- Scout compositions at dusk using PhotoPills AR view
- Pre-frame tents/foreground elements
- Pack lens heater strips to prevent dew
🎨 Composition Techniques: Beyond Stars
- Foreground Anchor:Silhouette tents against galactic coreIlluminate trees with brief LED painting (1 sec at 10% power)
- Rule of Thirds: Place core at intersection points
- Leading Lines: Use trails, rivers, or ridgelines
https://example.com/milky-way-composition.jpg
*Example: 20" exposure f/2.8 ISO 4000 – Joshua Tree NP*
🔧 Field Workflow: Shoot Like a Pro
- Arrive Early: Set up 1 hour post-sunset
- Dark Adaptation: Wait 30 mins – no white lights!
- Test Shot: 15" exposure at ISO 12800 → check focus/frame
- Capture Sequence:10+ identical shots (for stacking)5 dark frames (lens cap on)5 bias frames (1/4000s shutter)
- Avoid Condensation: Wrap camera in chemical hand warmer
🖥️ Post-Processing: Reveal Hidden Nebulae
Free Tools Workflow:
- Sequator (Windows) / Starry Landscape Stacker (Mac):Align + stack shots → reduce noise 300%
- DarkTable:Adjust exposure (+1.5 stops)Lift shadows (30%)Reduce green airglow (HSL sliders)
- GIMP:Enhance galactic dust with CurvesRemove satellites via Clone Tool
Pro Preset: Boost teal in highlights + magenta in shadows
⚠️ 5 Catastrophic Mistakes
- Ignoring Moonrise: Apps like SkySafari track lunar schedules
- Over-Processing: Halos around stars = amateur signature
- Vibrating Tripod: Hang backpack from hook for stability
- High ISO Grain: Stacking > cranking ISO
- Battery Failure: Cold drains 50% faster – keep spares in pocket
📸 Gear Alternatives
| Scenario | Solution |
|---|---|
| Smartphone Only | Use Night Sight mode + 10s timer; edit in Snapseed |
| No Tripod | Prop on bean bag + 5s delay |
| Light Pollution | Hoya Red Enhancer filter ($65) |
"You’re not just taking photos—you’re capturing photons that traveled 25,000 years through space."—Ansel Adams’ Astrophotography Principles
Final Shot Checklist:
- Turn OFF campsite lanterns
- Disable VR/IBIS on lenses
- Shoot in 3–2–1 countdown mode
- Breathe shallowly during exposure


