


How to Adjust Trekking Pole Length?
Properly adjusting your trekking poles is one of the most critical skills for comfortable and efficient hiking. While many hikers set their pole length once and forget about it, mastering terrain-specific adjustments can transform your experience on the trail, reducing fatigue, improving stability, and protecting your joints from unnecessary strain. This comprehensive guide will walk you through both the basic principles and advanced techniques for finding your perfect pole length in any situation.
Recommended trekking pole purchase link: https://s.click.aliexpress.com/e/_c4M7OWaN
The Foundation: Starting Length for Flat Terrain
Before hitting varied terrain, establish your baseline length on flat ground:
- Stand upright wearing your hiking shoes.
- Loosen the locking mechanisms on your poles.
- Adjust the segments so that when you grip the handle with the tip on the ground, your elbow forms a comfortable 90-degree angle.
- Tighten the locks securely.
This position creates optimal biomechanics for efficient energy transfer on level ground.
Terrain-Specific Adjustments
The real power of adjustable poles emerges when you customize length for different trail conditions:
- Uphill Sections: Shorten your poles by 5-8 cm (2-3 inches). This allows for a more efficient push-off motion without causing you to overreach behind yourself. Shorter poles help maintain an upright posture and prevent strain on your shoulders during ascents.
- Downhill Sections: Lengthen your poles by 5-8 cm (2-3 inches). Longer poles help you maintain proper posture by preventing excessive leaning forward. They reach the ground more easily when stepping down, reducing the dramatic impact forces on your knees—often by up to 25% according to research.
- Sidehill Traverses: When crossing slopes, slightly shorten the uphill pole and lengthen the downhill pole. This adjustment maintains better balance and prevents awkward arm positions.
Understanding Locking Mechanisms
Most trekking poles use one of two primary locking systems:
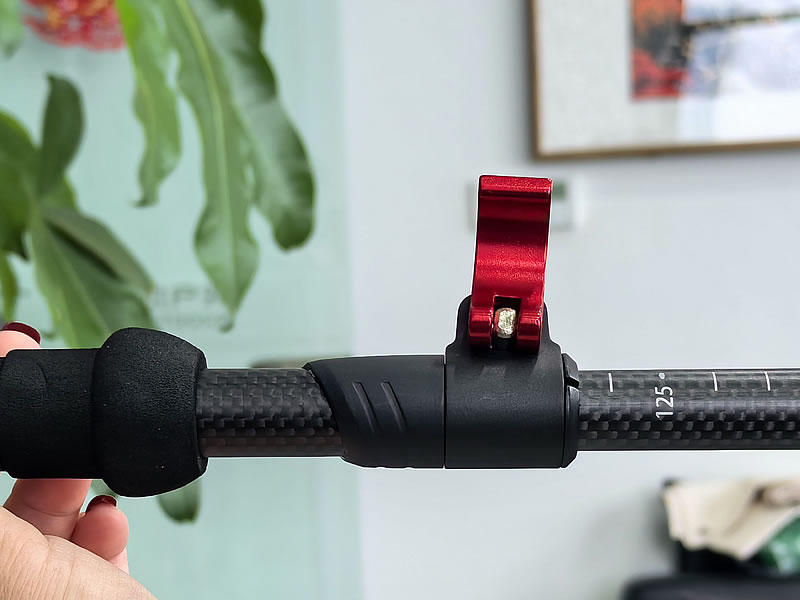
- Lever Locks (FlickLocks): These provide visible, mechanical closure that's easy to operate with cold or wet hands. They're generally more reliable for heavy loads and allow for precise incremental adjustments. To use: flip the lever open, adjust to desired length, then firmly close the lever until secure.
- Twist Locks: These offer a sleeker profile but can be trickier to adjust, especially with cold or wet hands. They require periodic maintenance to prevent slipping. To use: twist counterclockwise to loosen, adjust length, then twist clockwise to tighten firmly.
Step-by-Step Adjustment Process
- Anticipate Terrain Changes: Adjust your poles before starting a significant ascent or descent, not in the middle of it.
- Loosen Locks: Completely release the locking mechanisms on all adjustable sections.
- Set Length: Extend or retract the segments to your desired length, using the measurement markings as a guide.
- Secure Locks: For lever locks, ensure they're fully closed and tight. For twist locks, apply firm pressure while twisting clockwise until no movement is possible.
- Test Security: Gently apply weight to each pole before fully committing to ensure the locks are secure.
Advanced Techniques
- Micro-Adjustments: Make small changes (1-2 cm) based on how your body feels throughout the day. Fatigue, pack weight, and trail conditions might warrant tiny adjustments for optimal comfort.
- Quick Transition Method: When moving frequently between uphill and downhill sections, some hikers prefer to only adjust the lowest section of their poles for faster changes.
- Probing Depth: In uncertain terrain like stream crossings or snowfields, temporarily lengthen one pole to probe ahead for depth and stability.
Troubleshooting Common Issues
- Slipping Poles: Ensure locks are completely clean and dry. For twist locks, check if they need tightening with a screwdriver.
- Difficulty Adjusting: If poles become stuck, carefully apply a silicone lubricant to the joints and work them gently.
- Uneven Wear: Regularly rotate which section you adjust to prevent excessive wear on one segment.
Conclusion: Practice Makes Perfect
Like any skill, perfecting pole adjustments requires practice. Start by consciously adjusting your poles on different sections of your local trails. Pay attention to how different lengths affect your posture, breathing, and muscle engagement. With experience, these adjustments will become second nature, significantly enhancing your comfort, efficiency, and safety on any terrain. Remember that the "perfect" length is ultimately what feels most natural and supportive for your body—don't be afraid to experiment beyond these guidelines to find your personal sweet spot.


