


How to Use Walking Poles for Hiking Uphill? Mastering the Climb
For many hikers, the ascent is the most demanding part of the journey. Legs burn, lungs labour, and pace slows. Yet the solution to easier, more powerful climbing may already be in your hands. Walking poles, when used correctly, transform from simple balance aids into powerful climbing tools, engaging your upper body to share the workload and propelling you upward with significantly less perceived effort. This guide provides a comprehensive, step‑by‑step methodology for using poles on uphill terrain, ensuring you arrive at the summit with energy to spare.
Recommended trekking pole purchase link: https://s.click.aliexpress.com/e/_c4M7OWaN
The Core Principle: Poles as Propulsion, Not Just Support
On flat ground, poles provide stability. On uphills, they should provide propulsion. The goal is to use your arms, shoulders, and back muscles to push yourself upward, reducing the burden on your legs. This requires a shift in mindset: instead of simply planting the pole and stepping past it, you actively push off against it.
Step 1: Adjust Pole Length for Uphill
Shorten your poles by 5–10 cm (2–4 inches) from your flat‑terrain baseline.
| Adjustment | Why |
|---|---|
| Shorten | Allows you to plant the pole closer to your body, maintain an upright torso, and generate a powerful push‑off from behind. |
If your poles are too long:
- You will reach forward excessively, compromising leverage.
- Your torso will be forced into a hunched position, reducing lung capacity.
- You cannot generate an effective rearward push.
The test: On a moderate slope, with poles shortened, you should feel a natural, powerful planting motion. Your elbow should be slightly bent at the point of maximum push.
Step 2: Master the Propulsive Plant
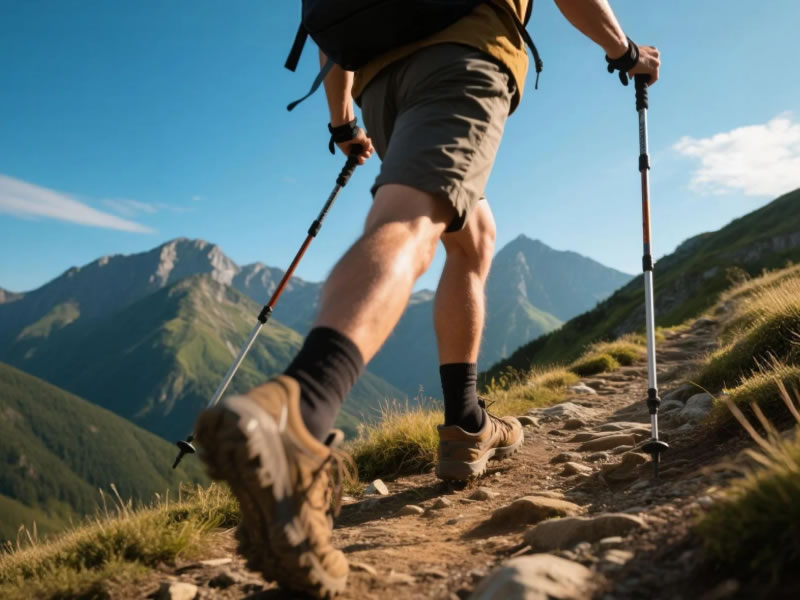
The Standard Uphill Technique
- Plant the tip beside or slightly behind your trailing foot. Do not plant ahead of your body—that creates braking, not propulsion.
- Engage the strap correctly. Your hand should be inserted upward from below, with the strap across the back of your wrist. When you push, the strap bears the weight, not your grip.
- Push down and back through the strap as you step forward with the opposite foot.
- Extend your arm fully behind you at the end of the push, maximizing the duration of force application.
- Maintain the opposite arm/leg rhythm: Right pole plants as left foot steps forward; left pole plants as right foot steps forward. This contralateral coordination is biomechanically efficient and engages your core.
Why it works: By pushing off from a position behind your center of mass, you add propulsive force to your stride. Your upper body muscles—lats, triceps, pectorals, and deltoids—assist your legs in lifting your body upward.
Step 3: The Double‑Plant for Very Steep Sections
On extremely steep, sustained climbs where the alternating rhythm becomes awkward, switch to a double‑plant technique:
- Plant both poles simultaneously at a point ahead of you.
- Pull down with both arms as you step upward, using your upper body to "hoist" your body and pack.
- Re‑plant both poles and repeat.
This is the most efficient method for gaining elevation rapidly with a heavy load. It is also useful when you need maximum stability on a very steep, loose slope.
Step 4: Maintain Upright Posture
Proper pole use encourages upright torso positioning:
- Avoid hunching over the poles. Your chest should be open, shoulders back.
- Look up, not down. Your poles are probing the trail ahead; trust them.
- Breathe deeply. An upright posture allows full lung expansion, critical for sustained climbing.
If you find yourself hunched, your poles may be too long. Shorten further.
Step 5: Cadence and Rhythm
- Match your pole plants to your step cadence. A quick, light rhythm is more efficient than slow, heavy plants.
- Avoid "stabbing" the ground. The plant should be smooth and deliberate, not jarring.
- Let the poles swing naturally. With proper strap use, your hands can remain relaxed, and the poles will "float" into position for the next plant.
Common Uphill Mistakes
| Mistake | Consequence | Correction |
|---|---|---|
| Poles too long | Hunched posture; reduced leverage; inefficient push. | Shorten 5–10 cm before climbing. |
| Planting ahead of body | Creates braking force; wastes energy. | Plant beside or behind trailing foot. |
| Death grip on handles | Rapid hand fatigue; poor energy transfer. | Use straps correctly; relax grip. |
| Ignoring the straps | All weight borne by hand muscles. | Insert hand from below; push through strap. |
| Stiff arms | Disrupts rhythm; increases fatigue. | Allow natural elbow flexion and extension. |
| Same‑side rhythm (left pole with left foot) | Awkward, inefficient, reduces stability. | Maintain opposite arm/leg rhythm. |
Gear Considerations for Uphill Efficiency
| Feature | Why It Matters for Uphill |
|---|---|
| Lightweight poles | Reduces arm fatigue over long climbs. Carbon fiber ideal. |
| External lever locks | Allow quick length adjustments when terrain steepens. |
| Comfortable grips (cork) | Reduce hand fatigue during sustained pushing. |
| Secure straps | Essential for effective weight transfer. |
| Carbide tips | Provide reliable traction on loose, steep terrain. |
Advanced Technique: The "Power Hike"
On very long, sustained climbs, experienced hitters use a modified technique:
- Shorten poles more aggressively (up to 15 cm shorter than baseline).
- Adopt a slightly more forward lean while keeping back straight.
- Focus on a powerful, deliberate push with every plant.
- Use the double‑plant on the steepest sections to rest different muscle groups.
This "power hike" rhythm can be sustained for hours with practice.
Uphill Poles and Backpacking
When carrying a heavy pack, the uphill benefits of poles are magnified:
- Poles share the load between legs and upper body.
- The double‑plant technique becomes essential for hoisting a heavy pack up steep steps.
- Stability on loose, steep terrain is critical with a high center of gravity.
Always ensure locks are fully tightened before committing weight—a slipping pole under a heavy pack is a safety hazard.
Summary: Uphill Pole Technique at a Glance
| Element | Correct Technique |
|---|---|
| Length | Shorten 5–10 cm from baseline. |
| Plant position | Beside or slightly behind trailing foot. |
| Strap use | Hand up from below; push through strap. |
| Rhythm | Opposite arm/leg (right pole/left foot). |
| Push | Down and back; full arm extension. |
| Posture | Upright, chest open, looking ahead. |
| Very steep | Double‑plant: both poles ahead, pull upward. |
Conclusion: Let Your Arms Help Your Legs
Uphill hiking does not have to be a test of leg strength alone. With proper technique, your poles become powerful allies, recruiting your upper body to share the workload and propelling you upward with less effort. The key adjustments are simple:
- Shorten your poles.
- Plant behind you.
- Push through the straps.
- Maintain rhythm.
Practice these elements on your next climb. Within a few miles, they will become automatic. You will climb faster, feel less fatigue, and arrive at the summit with more energy for the descent—and the next peak beyond.
Your legs will thank you. Your arms will, too.


