


How Long Should Walking Poles Be? The Complete Guide to Proper Sizing
The question "How long should walking poles be?" has a simple answer—and a more complex one. The simple answer is the 90‑degree rule. The complex answer involves dynamic adjustments for terrain, personal biomechanics, and the type of walking you do. This guide provides a comprehensive framework for determining the optimal pole length for your body, your terrain, and your walking style.
Recommended trekking pole purchase link: https://s.click.aliexpress.com/e/_c4M7OWaN
The Foundation: The 90‑Degree Rule
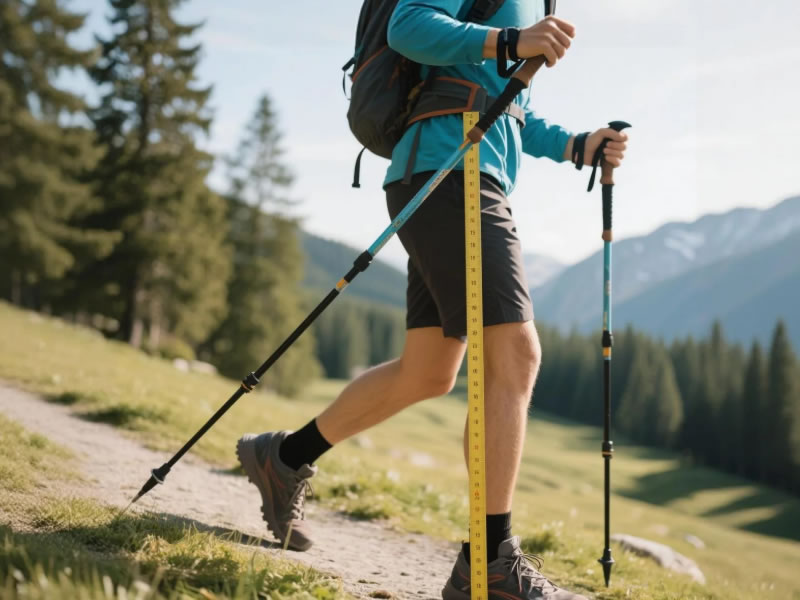
For walking on flat terrain, the correct pole length is determined by a simple biomechanical test:
- Stand upright on a level surface wearing your typical hiking shoes.
- Grip the pole handle as you normally would.
- Place the tip on the ground beside your foot.
- Your elbow should form a 90‑degree angle. Your forearm should be parallel to the ground.
Why this works: This position allows for an efficient arm swing, optimal power transfer, and neutral wrist posture. It is the reference point from which all other considerations flow.
If you do not have a 90° angle:
- Elbow >90° (arm too straight) → Pole is too long; shorten it.
- Elbow <90° (arm too bent) → Pole is too short; lengthen it.
The Formula Method: A Starting Point
If you cannot physically test poles, a general formula provides a reasonable starting point:
Pole Length (cm) = Your Height (cm) × 0.68
Example: A 175 cm (5'9") hiker: 175 × 0.68 = 119 cm
Height to Pole Length Quick Reference:
| Your Height | Approximate Pole Length |
|---|---|
| 150 cm (4'11") | 102 cm |
| 160 cm (5'3") | 109 cm |
| 170 cm (5'7") | 116 cm |
| 180 cm (5'11") | 122 cm |
| 190 cm (6'3") | 129 cm |
Important: This is a starting point, not a substitute for the 90‑degree test. Individual proportions (torso vs leg length, arm length) vary.
Adjustable vs Fixed‑Length Poles
Your choice of pole type affects how you approach sizing.
Adjustable (Telescoping) Poles
- Advantage: You can fine‑tune length for different terrains and share poles with others.
- Sizing method: Use the 90° rule to set your baseline. Then adjust dynamically as described below.
- Best for: Hikers who encounter varied terrain, backpackers, anyone unsure of their exact preferred length.
Fixed‑Length Poles (including most folding/Z‑poles)
- Advantage: Lighter, simpler, more packable.
- Sizing method: You must choose a single length that works for most of your walking. Use the 90° rule or formula to select.
- Best for: Fitness walkers on predictable terrain, ultralight hikers, those who prioritize packability.
If choosing fixed‑length poles: Err on the slightly shorter side if you anticipate more climbing; err on the slightly longer side if you anticipate more descending. Many manufacturers offer size ranges (e.g., S, M, L) based on height.
Dynamic Adjustment: Matching Length to Terrain
For adjustable poles, your baseline length is just the beginning. You must adapt as the trail changes.
| Terrain | Adjustment from Baseline | Why |
|---|---|---|
| Flat | None (90° elbow) | Optimal for efficient, rhythmic walking. |
| Uphill | Shorten 5–10 cm (2–4 inches) | Allows you to plant closer to your body, maintain upright posture, and generate powerful push‑off. |
| Downhill | Lengthen 5–15 cm (2–6 inches) | Enables planting ahead of your body, creating a braking action that reduces knee impact and improves stability. |
| Sidehill | Uphill pole shorter; downhill pole longer | Keeps shoulders level; downhill pole acts as outrigger. |
| Stream crossing | Lengthen 5–10 cm | Provides extra reach to probe streambed ahead. |
| Deep snow / mud | Lengthen 5–10 cm | Prevents basket from sinking too deeply. |
Commit to the habit: Adjust before every major terrain change. It takes seconds and pays dividends in comfort and joint protection.
Special Considerations
1. Nordic Walking / Fitness Walking
For dedicated fitness walking on flat or rolling terrain, many users prefer fixed‑length poles sized precisely to the 90° rule. The emphasis is on a consistent, efficient gait, not terrain adaptation.
2. Heavy Backpacking
When carrying a significant load, you may benefit from poles that are slightly longer than your baseline on descents (up to the maximum recommended 15 cm) to provide extra braking force.
3. Seniors or Those with Balance Concerns
A slightly longer pole (1–2 cm above 90°) can provide a more upright, stable posture. Experiment carefully.
4. Children
Children's poles should be adjusted more frequently as they grow. The 90° rule applies equally, but err on the side of slightly shorter to encourage good technique.
5. Winter Walking / Snowshoeing
With bulky winter boots or snowshoes, you may need to lengthen poles by an additional 5–10 cm beyond your summer baseline to account for the added height underfoot.
Common Sizing Mistakes
| Mistake | Consequence | Correction |
|---|---|---|
| Poles too long | Hunched posture, shoulder strain, reduced leverage on climbs. | Shorten to achieve 90° elbow on flat ground. |
| Poles too short | Over‑reaching, back strain, inefficient descents. | Lengthen to 90°; consider slightly longer for descents. |
| Never adjusting for terrain | Missed knee protection on descents; inefficient climbing. | Adjust for every major terrain change. |
| Ignoring sidehill adjustments | Uneven arm position, reduced stability. | Adjust each pole independently. |
| Using fixed‑length poles on highly variable terrain | Compromised efficiency on climbs or descents. | Choose adjustable poles for variable terrain. |
How to Test Your Sizing
At home or in a shop:
- Set poles to estimated length.
- Stand on level floor, tip on ground, elbow at 90°.
- Simulate a walking motion. Do your arms swing naturally? Do your shoulders feel relaxed?
On the trail:
- After 10–15 minutes of walking, reassess. Do your hands, arms, or shoulders feel strained?
- If climbing, do you feel you have enough leverage? If descending, do you feel stable?
Fine‑tune until it feels right.
Summary: Quick‑Reference Card
| Situation | Pole Length |
|---|---|
| Flat terrain baseline | 90° elbow angle |
| Uphill climbing | Baseline minus 5–10 cm |
| Downhill descent | Baseline plus 5–15 cm |
| Sidehill traverse | Uphill pole shorter; downhill longer |
| Stream crossing | Baseline plus 5–10 cm |
| Deep snow/mud | Baseline plus 5–10 cm |
| Nordic walking (fixed) | 90° elbow, no adjustment |
| Sharing poles | Mark your preferred settings with tape |
Conclusion: The Right Length Transforms Your Walk
Getting the right pole length is not a minor detail—it is foundational to the benefits of using poles. Too long, and you compromise leverage and posture. Too short, and you miss out on knee protection and efficiency. Correctly sized, and poles become a seamless extension of your body, providing support, propulsion, and comfort without conscious thought.
Start with the 90° rule. Adapt to terrain. Listen to your body.
Your knees, your shoulders, and your walking efficiency will thank you for every mile.


